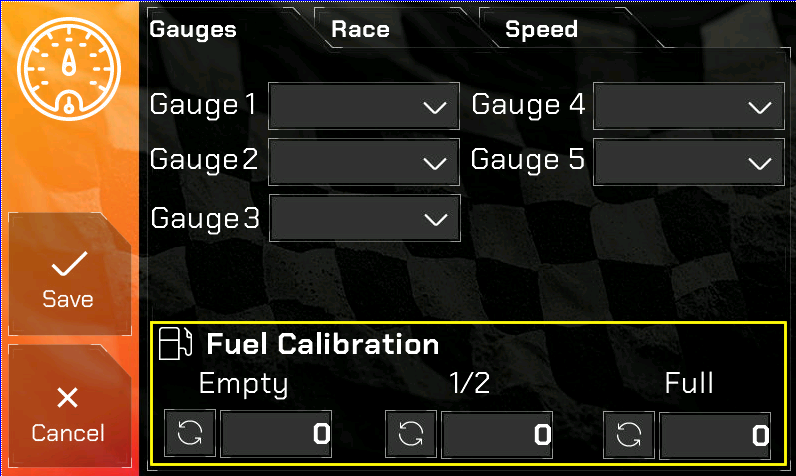
This demo was done using a Universal sending unit from Amazon. Concept is the same. The update rate is 10 seconds for the fuel level. The video is from a previous version but the process is the same. Video is at the bottom of the page.
To access the Fuel Sender Configuration, go to the Configuration Screen and press Gauges.


You must only use the SENDING WIRE from the SENDING UNIT to the NexLINK Pro ECU Interface.
DO NOT APPLY VOLTAGE TO THE FuelLvl PIN!!!!
Overview of Calibration Process: To ensure accurate readings from your fuel gauge’s Sending Unit, it’s crucial to REMOVE the POWER wire from the real gauge before taking each measurement. Failing to do so WILL RESULT in inaccurate readings. The calibration involves a sequence of powering off the gauge, recording measurements, and then powering it back on to move to the next measurement point.
Detailed Steps:
Initial Low Fuel Measurement:
- Drive to a gas station when your tank is about 1/4 full (or less, if you’re willing to take the risk).
- REMOVE the POWER wire from your REAL FUEL GAUGE!
- Before turning off your vehicle (with the key in the ON position but the engine off), navigate to the Configuration screen of your Pro Edition Digital Dash.
- Press the Refresh icon a few times to take multiple Empty/Low Fuel readings. This will record the current low fuel value, ensuring that you capture a more accurate and reliable reading for your current fuel level.
- Press Save to store this value and the Pro Edition will restart.
1/2 Tank Fuel Measurement:
- Power on your actual fuel gauge.
- Fill your tank to about 1/2 full.
- REMOVE the POWER wire from your REAL FUEL GAUGE!
- Return to the Configuration screen on your Digital Dash.
- Press the Refresh icon a few times to take multiple readings. This will record the current 1/2 tank value, ensuring that you capture a more accurate and reliable reading for your current fuel level.
- Press Save to store this value and the Pro Edition will restart.
Full Tank Measurement:
- Fill your tank to full.
- REMOVE the POWER wire from your REAL FUEL GAUGE!
- Return to the Configuration screen on your Digital Dash.
- Press the Refresh icon a few times to take multiple readings. This will record the current Full tank value, ensuring that you capture a more accurate and reliable reading for your current fuel level.
- Press Save to store this value and the Pro Edition will restart.
You may remove your physical fuel gauge at this point. Do NOT wire it back up because the readings will be thrown off!
By following these steps carefully, you ensure each crucial fuel level (low, mid, and full) is accurately measured and calibrated in your system. Remember to disconnect the power to your actual fuel gauge before each measurement to maintain accuracy.
Note on Interpreting the Values:
When examining the three values representing the fuel levels – Empty, 1/2, and Full – expect them to display a consistent and sensible progression. Regardless of whether the numbers are increasing or decreasing, the order should always start from the ‘Empty’ value. This means:
- Increasing Order: The values should start from the smallest number at ‘Empty’ and increase towards the largest number at ‘Full’.
- Decreasing Order: The values should also start from the ‘Empty’ reading, but in this case, it will be the largest number, decreasing towards the smallest number at ‘Full’.
Essentially, when viewing these values from left to right (Empty → 1/2 → Full), they should either consistently increase or decrease. Remember, the specific numerical values themselves are not your concern as they are computed internally. Your focus should be on ensuring that the sequence from Empty to Full follows a logical and consistent progression.
